|
|
Trimming Irish Terriers by
Neridah Sharrett
This site is designed as a pictorial hint for beginners and people who want to trim their pets. Show trimming is a much more involved art and maybe one day I will get the time to put something more up on this website. Before we start you should go to the Pearson Stripping Knife website grooming section. Look at the chart for the wire fox terrier but note, I don’t advocate stage stripping Irish Terriers, they look much better if they are done in one go. For show trimming I will slowly peel done fronts and butts ie take one third of the hairs out every 2 weeks until it is all gone, that way it will grow in in stages. As said before this information is not for the show dog, it will keep you pet in good coat though.
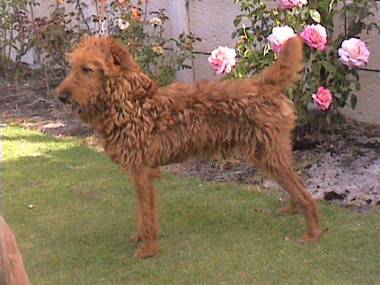
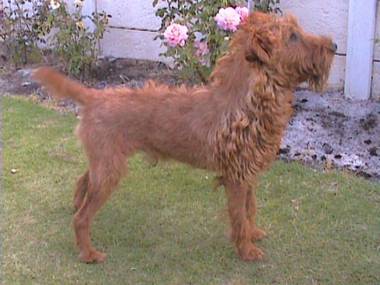
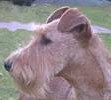
First of all your Irish in the rough could look something like this:
Don’t worry about bathing this dog, it is easier to strip him if he is a bit dirty, clean coats can slip in your fingers. You will bath him after he has been stripped.
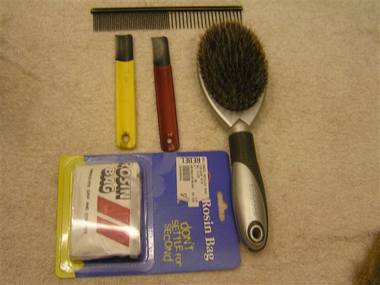
Tools you will need include:
A greyhound comb
A Stripping knife (course and fine) I use McClelland strippers (as pictured)
A bag of Rosin (very handy, get it from a sports shop) A Hog Hair bristle brush with nylon guards A pair of Scissors
Clippers
A grooming table with a noose if very useful but if you can’t afford it then you can try sitting on the floor with your dog, it might sound silly to some but it can work if your dog will sit or lie still.
The actual stripping:
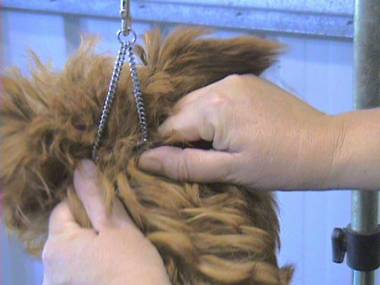
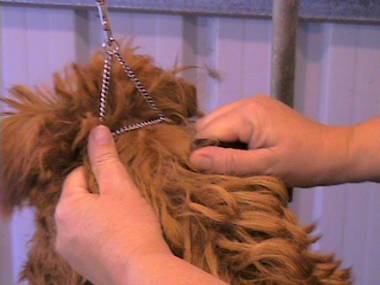
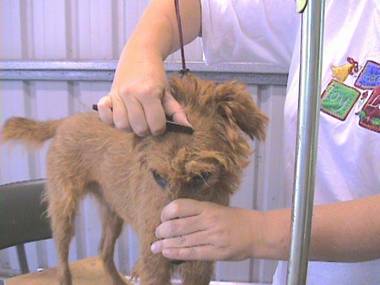
I like to start at the top of neck. Make sure you anchor the skin above where you are about to pull. Be firm with the anchor as it really does stop you pulling on the dog.
Handy Hint: Gripping the hair is made so much easier by using your Rosin bag. When the hair is easier to grip it comes out easier, so it’s nicer for all concerned. I gently tap the Rosin bag against the dog, he might look at you like your strange to start with but eventually he will not care.
Left hand has an anchor on the skin, right hand holds the knife (reverse this if you’re left handed), you collect a small amount of hair between the knife and your thumb then pull in the direction the hair is growing (never pull in the opposite direction, NEVER). The pull should be quick and decisive, not slow.
Work down the neck towards the shoulders. Don’t worry if you get a couple of bare patches, this just means you have taken out some undercoat as your going. NOTE: I don’t strip to skin, some people do particularly on Airedales as they have thick undercoat, on Irish I leave the undercoat on the dog. Now continue down and along the body. Don’t worry about the throat and shoulders at this stage. Go down the side of the dog too. When you have done one side he will end up looking something like the photo below. This is the easy side for right handed people. Don’t loose heart with the more difficult side, you have to finish the job and finish it on the same day.
Handy Hint: Lie the dog on his side, it is much easier than trying this with him standing up, you will not be at such a weird angle with your wrists.
Note that I have trimmed down the back of this dogs legs too. This dog does not appear to have a lot of furnishings but I have left the hair on the curve
Handy Hint: Give yourself and your dog plenty of breaks. This is a repetitive activity and most of us long time groomers have suffered inflamation from prolonged grooming. The dogs also need to enjoy this experience, so lots of breaks with a game included is good.
Now do the same to the other side of your dog and continue up and under his tail. Once that has been done start work on the top of the head. I do this by holding the head steady and gently pulling in the direction the hair is growing. This is and area where the Rosin bag is really useful, particularly with top and bottom of ears. Handy hint: holding the nose down like this not only gives control but it does anchor the skin on the head.
When you have finished the head you need to work down the throat. Do this by lifting the head and working down in the direction that the hair is growing. This area has hair growing in all directions, including down, up and sideways. Remember to always pull in the direction the hair grows.
Handy Hint: If you can get the dog to lie down you will find this area easier to trim. You will be bending over the dog though, so remember to look after you back.
Now comb out the leg hair and trim any scraggly hairs. You will take the long hair off the dogs elbows, pulling it in an upwards direction.
Finish off by scissoring around his feet, trimming his nails and clipping the belly and private parts.
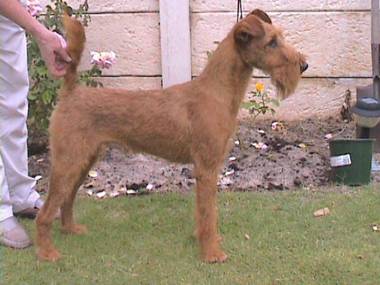
When you have finished your dog should look like this (maybe without the flag on his tail!!!). Yes this is the same dog as the one at the top of the page!!! Now that you have finished you should give your dog a nice warm bath, make sure you really massage him along the spine because two things make a bath enjoyable for a dog
a) warm water - the hose in the back yard is NOT a good idea!!
b) a massage all over
Now towel off the dog as much as you can then keep him out of cold drafty areas until he is fully dry.
Copyright protected Neridah Sharrett 2006
Neridah Sharrett Canning Vale, WA, Australia Phone : 08 9455 1059 Email : [email protected] |